By John Bigelow.
The use of video is becoming an increasingly important part of many school curriculums. Ten years ago, a school assignment was something a student wrote. Now, it is not uncommon to find students handing in assignments that have been completed as a video project.
Take, for example, an assignment about the school’s local area. A student might be required to research the history of the area, talk to some locals about their recollections of the area from when they were children, and gather those same people’s views about how the area has evolved over the past few decades. In the past, such a project might be presented to the class as a written essay with accompanying images. These days, the same project might be presented as a video essay with students formulating questions and then interviewing locals, before editing that footage together with shots of the region to explain the historical significance of specific sites, and so on.
Some schools might, instead, simply choose to video their speech night, school play, or school sports carnival. A nice touch with the school sports carnival is to assign reporters, a producer and director to cover specific events and interview athletes. Then the video can be uploaded to the school’s website for the school community to watch.
Regardless of the project, and there are a myriad of possible options, video is becoming an increasingly important part of the modern school curriculum.
When creating a video, there are a few basic dos and don’ts that can make or break a project.
An often-overlooked aspect of a successful video production is the audio. Surprisingly, even if the quality of the video images is poor- for example, unfocused, poorly framed, shot from too far away or jerky- as long as the audio is good quality, the project will still be watchable.
If, however, the quality of the captured audio is poor – too soft, loud background noise or wind noise drowning out speech, for instance then it does not matter how good the video quality is, the project will be unwatchable and no amount of editing will fix it.
To help ensure that your students get the best results for their video project, we have listed a few audio basics to help maximise the overall quality of the
end result.
Microphone Selection
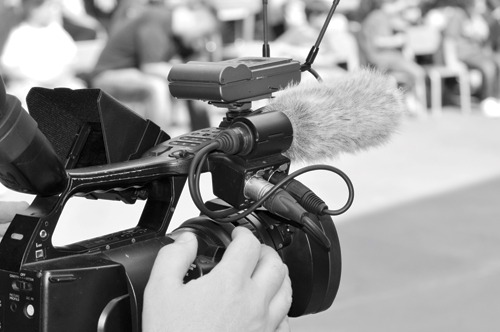
Everything begins with the microphone. Schools often rely on the small condenser microphone that is built into the camera as the sole source of audio capture. This is something akin to gambling. You often won’t know if the microphone is any good until you are editing your project– at which point, it is too late. Furthermore, few in-built camera microphones have the ability to effectively capture audio over any distance or eliminate wind noise.
Most small to medium-sized video cameras will feature a microphone input; either by way of a high-grade, balanced XLR input, or a small 3.5 mm input jack (similar to a headphone plug). The type of microphone input jack built into the camera will dictate the type of microphone you can use with the camera, and how you can use it. The first thing to understand is that you should always use an external microphone in addition to (or in place of) the camera’s in-built microphone. If your school is looking to purchase a video camera or cameras, an external microphone input should be considered as a must-have feature. Preferably an XLR input, but a 3.5mm input, will suffice.
Why should you use an external microphone? First of all, aftermarket external microphones will often be of a higher quality than the camera’s in-built microphone. Secondly, a camera’s in-built microphone will typically be omni-directional. This means it will record sound from all around the camera, making it harder to capture speech. For recording speech, such as interviews, or video dialogue, it is better to use a uni-directional microphone which will primarily capture the sound directly in front of the microphone. This eliminates a lot of background noise and increases
speech clarity.
Another good reason to use an external microphone is that you can use an extension lead to get the microphone much closer to the source of the sound you are recording, while still capturing distant images. Alternatively, if a person is being interviewed, they can hold the microphone which is attached to the camera via a long lead, eliminating virtually all background noise.
Microphone Placement
Microphone placement is very important. The chance that a camera’s small, in-built microphone will effectively capture good-quality audio from any more than a metre or two away from the audio source, is pretty low. This decreases as the ambient noise increases. (For example, wind, crowds, wildlife and so on.) In order to capture good-quality audio, it is important to get a reasonable-to-good–quality, directional microphone as close to the source of the sound as possible.
In the case of a person speaking, quality audio could be achieved by having that person hold the microphone attached to the camera by a lead, or by placing the microphone in a stand just out of view of the camera and pointing directly towards the person’s mouth. Alternatively, you may have someone holding the microphone on a pole (often referred to as a boom) above the person speaking. This can be more effective if you have to record the voice of more than one person, as the boom operator can manoeuvre the microphone backwards and forwards among the speakers as required. Your boom might be something as simple as a broomstick to which the microphone can be taped.
Monitoring Levels
Your camera should have a visual display for the sound volume being captured. It is important that you monitor this display and get a good level before you start recording. In most cameras, the volume display will range from green to yellow and then to red. You want to set your levels so that the volume meter is passing through the yellow and just touching the red. If the level sits squarely in the middle of the green, this will generally mean the level is too low and you will have trouble hearing the audio in the final video.
Using Headphones
Most cameras of reasonable quality will also have the facility to plug in headphones so you can hear what is being captured by the microphone. Use headphones! You must monitor the sound levels at all times. Simply watching the volume meter does not tell you what is being recorded, it only tells you how loud it is. You might find that you are actually recording the birds singing in the trees, or the wind.
By using headphones to monitor your sound levels, you will know exactly what you are recording and whether or not it will work on the video. There is nothing more annoying than spending an entire day shooting, and then getting to the editing stage only to find that sections or, perhaps even the entire video, is unusable due to background noise or inaudible speech.
Follow these simple rules, ask your AV supplier for some help and you should end up with good-quality video that everyone can enjoy. Remember, the audio in a video is as important, if not more important, than the picture quality.

Latest posts by Education Technology Solutions (see all)
There is 1 comment
Add yoursPost a new comment
You must be logged in to post a comment.

[…] Final Cut you can expand audio clips for advanced editing. This is extremely important in filmmaking as the sound is of high importance for production […]